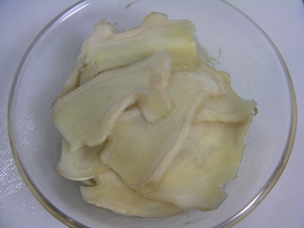
The sliced and salted ginger is still quite white.

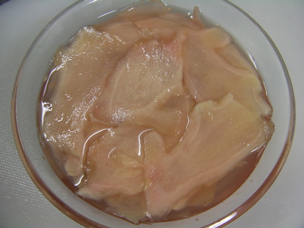
Add the vinegar and honey and it turns light pink.
Order the daily special or a set meal in a local Japanese restaurant and along with the rice and miso soup, you are almost certain to receive some kind of pickle as a side dish. Pickling basically started as a way to preserve foods in Japan’s extremely humid climate but over the centuries it has become a fine art, with all manner of vegetables, fruits, seafood, etc. getting the treatment. The best known of these is probably gari, the ginger pickle traditionally served with sushi.
While gari is essentially very healthy thanks to its main ingredients of ginger and vinegar, many recipes call for large amounts of, usually white, sugar. You generally don’t eat a whole lot at one time so this is no reason to avoid gari but I was interested to see how substituting with a healthier sweetener like honey would affect the flavor. The results were rather good.
Ingredients
• 1 large stem of fresh ginger
• 1 cup of quality rice vinegar
• 1 to 2 tablespoons of honey
• 1 teaspoon of natural salt
I used one stem from one of the
packs in this picture. One pack
yielded two stems, each about
the size of a man’s hand.
Preparation
1. Wash the ginger and rub off any rougher pieces of skin. It’s fine to keep the skin but thicker pieces don’t pickle well. Also retain any pink shoots growing from the stem.
2. Use a slicer or peeler or, if you’re precise, a knife to cut the ginger into thin slices. Aim for longer, wider pieces. A few bits will break off but you can always use those to make up a batch of adrak ka achar or some ginger tea.
3. Place the slices in a dish, sprinkle over the salt and mix by hand. (You can also place the ginger directly into the final container for convenience.) Let this stand for around 30 minutes. The ginger will release quite a bit of liquid, which you can either pour off (into your tea) or retain for a stronger flavor.
4. Heat the vinegar to near boiling and add the honey to dissolve it. Next, pour the hot liquid over the ginger so that it is fully covered. If it’s fresh, the ginger should start to turn light pink almost immediately.
5. Leave the gari to cool and then seal it in an airtight glass container for storage in the fridge. You can eat it later the same day but the flavor mellows considerably after three or four days. Apparently homemade gari keeps for about a month – if you’re a slow eater.
Notes
Salt is not an essential ingredient and some recipes leave it out all together. Fresh ginger (shin shoga) is important, however, unless you like your gari with a burn. If using older ginger, it may be useful to simmer it for a couple of minutes to soften the texture. Also, try to use good quality vinegar. It will produce a better flavor and save you from the surprising number of additives in many products.
Finally, about the honey: I’ve specified 1 to 2 tablespoons in the ingredients but more will produce a rounder flavor. Follow your taste buds but try to keep the sugar low. It’s also unnecessary to boil the honey and vinegar in step 4. Honey’s antimicrobial activity is impressively resistant to heat but less is definitely better.

What do you mean by slicer to cut the ginger in #2? Peeler is just veg peerler right? I tried to use a knife before but it would need to be a razor to make it thin enough.
Hey Jon. My slicer is a flat, rectangular plastic frame with an opening where you can slot in different kinds of blades. For making gari, I use the standard straight blade. When I slide the ginger across the blade, it makes the thin slices you see in the pictures above. You can probably pick one up for a few dollars in the kitchenware section at your supermarket.
Yes, a peeler is a vegetable peeler. They also work fine. A knife is possible but you would need a thin blade and a bit of focus. I’d recommend using the slicer for the best result.